Trueness, precision and accuracy - demystified
3D vision systems are complex and have several demands that are important to be met in order to be effective and reliable when deployed with a robot as a larger overall solution for tasks such as pick and place or machine tending in manufacturing.
Amongst these demands are the inter-related topics of trueness, precision, and accuracy. Have a look at our "trueness challenge" video before reading more:
Read our technical paper about trueness:
- Prologue: Test of Trueness: Balloon vs. Pushpin
- Part 1: I Can See it But I Can't Pick it: Why Trueness is the Secret to Reliable Picking
- Part 2: Precision and Trueness: Seeing the Details and Remaining True to Reality
- Do you want to go further? This is a sample of our white paper "Understanding accuracy in vision-guided pick and place". Read it here:
The top-level summary is as follows:
- Trueness, (systematic errors). Trueness tells us how far away a measurement is from the true/actual value. For example, the true position of a point, versus that of a measured point. These two should be a as close to each other as possible.
- Precision, (random errors). Precision shows us how scattered the measurements are. For good precision we want tightly grouped measurements, we should see close to the same value each time we measure.
- Accuracy, (total errors). The accuracy of our system is the combination of our trueness and precision. We always want as accurate a system as is possible, therefore we need to make sure we are getting the very most from both precision and trueness to achieve this.
There is a bit of confusion
There is a fair amount of confusion around these three words in many quarters and not just 3D vision. A good deal of the confusion comes from them being such widely used words in so many different contexts, it can be hard to nail them down to specifics. In 3D vision, a customer might often ask about a camera’s precision, when in fact, in the 3D vision context, precision might not be what they’re looking for.
Measurement errors – random and systematic
The International Standards Organization (ISO) has something to say about this under ISO 5725, and we should take note:
ISO 5725 uses two terms trueness and precision to describe the accuracy of a measurement method:
‘Trueness refers to the closeness of agreement between the arithmetic mean of a large number of test results and the true or accepted reference value.’
‘Precision refers to the closeness of agreement between the test results.’
This is a succinct and clear definition. How about a real-life example, it might help?
If you shoot a rifle on a range, or a bow and arrow if you prefer the quiet, if your shots are all tightly grouped together, you have good precision. They may be off from the target center, but if they’re close together the precision (your aim and shot) is good. If your shots are generally evenly spaced around the bullseye, then you have good trueness (your rifle and scope are calibrated and ok). A good shot, with a good, calibrated rifle achieves tight groupings close to the bullseye, they are an ‘accurate’ shot.
So, when taking a measurement, whether with a ruler or a 3D camera there will be errors, systematic errors, and random errors.
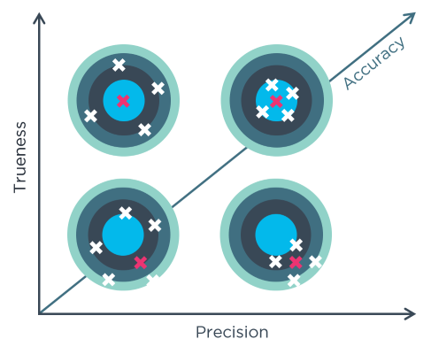 The trueness, precision, and accuracy relationship
Now you can probably see how these three characteristics matter in robot-arm picking tasks. We need the "robot’s reality" to be as close a match to "actual reality" as possible. This payback on this is the robot’s grippers will be very accurate during the identify and pick process. If the system is a pick-and-place system, then it has accuracy demands at the other end also for inserting and placing objects exactly where they need to be.
To some degree picking systems with less-than-optimal accuracy, whether through trueness or precision, can mitigate the deficiency with suction cups or special grippers that are tactile and brings some ‘play’ into the pick operation. But with heavier objects and faster picking operations, this isn’t always possible as the gripper will be tackling a heavy object that will most likely slip from a soft gripper-fingers.
In manufacturing CAD-matching is a technique often used whereby an existing 3D CAD image of the object is compared to the 3D image to identify the object, the pick-pose etc. There will be inaccuracies and calibration drift throughout the total system chain, from camera, through the detection algorithm, and finally in the robot system itself. The typical breakdown of where errors are introduced is illustrated below.
As can be seen, 40%+ of these can originate in the 3D camera system. Given this relatively large proportion of the error pie, at Zivid we have a deep focus on reducing these and maintaining a very high degree of trueness when the cameras ship and also that the design ensures high trueness performance over time when deployed. All these system elements have a cumulative system error effect as shown here:
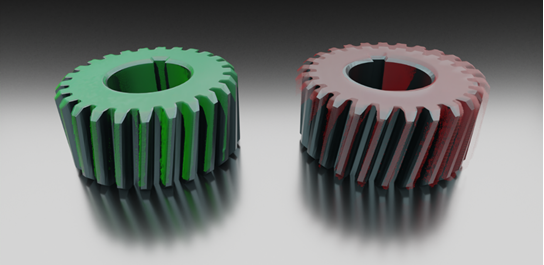 CAD image matching (left: good match, right: poor match)
True-to-reality point clouds from Zivid
Zivid 3D cameras have best-in-the-business point clouds when it comes to definition and accuracy. But all 3D vision systems will have some errors, and errors that accentuate over time due to going out of calibration. At Zivid we calibrate all of our 3D cameras at our factory before they ship. In addition to this, we give each one over 100 hours of intensive testing to ensure it remains within the calibration window, even under extremes of vibration, drop, and temperature. When re-calibration is necessary, it will be typically after an extended period of operation as we have designed in the ability to withstand the usual causes of drift. When calibration is needed, we offer all the easy-to-use accessories and tools to perform this quickly and efficiently with minimum impact to your robot cell’s operation.
Want to learn more on this subject? Read our technical paper about trueness:
- Prologue: Test of Trueness: Balloon vs. Pushpin
- Part 1: I Can See it But I Can't Pick it: Why Trueness is the Secret to Reliable Picking
- Part 2: Precision and Trueness: Seeing the Details and Remaining True to Reality
- Do you want to go further? This is a sample of our white paper "Understanding accuracy in vision-guided pick and place". Read it here:
You May Also Like
These Related Stories
Meet Zivid One+ at PICK&PACK expo
Capturing Unusual Objects in 3D
