As humans, we take for granted how much feedback we rely on in our everyday lives to complete the simplest of tasks. From drinking a cup of water to walking down the street, we constantly adjust our motion and how we move. We use visual feedback, pressure feedback, and prior knowledge to make the best paths and choices possible.
Humans are incredibly complex systems and the best learning machines on the planet. Think about it: if you stand close to a wall, you know, if you stick your arm out, if you will touch it or not because you know where your eyes are in relation to your hand. This relationship between the eyes and the hands is what we define as hand-eye calibration in robotics.
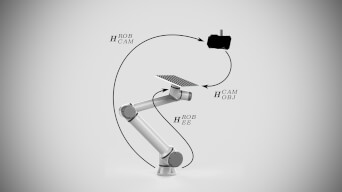
Zivid cameras are high-quality pieces of measurement instrumentation, but no matter how perfect and true to life the point clouds are, they are useless without a definition of the relationship between the robot and the camera. In the world of industrial automation, hand-eye calibration between a 3D camera and a robot is critical for ensuring accurate and efficient performance.
This article is a summary of our on-demand webinar. Watch it to get our full insight on hand-eye calibration: .png?width=700&height=467&name=hand%20eye%20webinar%20header%20(Facebook%20Cover).png)
Table of contents
- When hand-eye calibration goes wrong
- Zivid's hand-eye calibration method
- Building accuracy from the ground up
- The camera is true. What next?
- Other sources of error
- Conclusion
When Hand-Eye Calibration Goes Wrong
First, let's consider what happens when hand-eye calibration is incorrect. A robot that relies on a poorly calibrated 3D camera will likely experience significant inaccuracies in its positioning and movement. This can result in a decrease in productivity and possible stoppage of the system. In some cases, it can even cause damage to the robot or the goods the robot is interacting with, leading to costly repairs and replacements.
The hidden costs of poor hand-eye calibration are not limited to production inefficiencies and equipment damage. The inaccuracies that result from a poorly calibrated system can also impact the quality of the end product. For example, in the automotive industry, even minor inaccuracies in the alignment of body parts can cause significant problems with paint quality and surface finish.
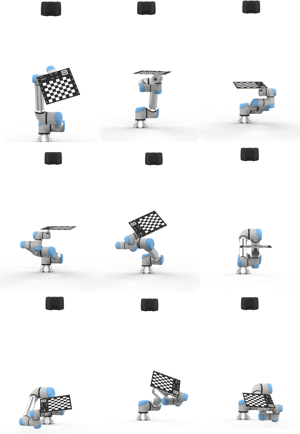 Different poses in an eye-to-hand calibration method
Poor hand-eye calibration can also lead to increased safety risks. A robot that is not accurately aligned with its 3D camera is more likely to collide with obstacles or cause harm to human workers. This is especially true in hazardous work environments, where robots are required to operate in close proximity to people.
Currently, everyone is taking a chance at developing their own hand-eye calibration methods. There is no one agreed-upon standard that is used consistently for finding the calibration for a full robotic system. Some companies use three points on a checkerboard, and some use spheres for calibration, while others have created their own unique 3D object that looks different from every angle. One of the most common solutions is having a whole checkerboard as the target, which is what we do at Zivid. We use both the 2D and 3D corners to find our hand-eye calibration solution.
Zivid’s Hand-Eye Calibration Method
Finding the best way to calculate the relationship between the camera and the robot and then into the world frame is a topic that is constantly being investigated. Finding the best poses to capture the data, the best optimization method, and the best calibration targets is continually up for debate. The calibration target we recommend is the Zivid checkerboard. We’ve put hours of work into designing a calibration target that is robust and easy to use. And let’s be honest; it looks pretty cool too.
Hand-eye calibration process with Zivid
At Zivid, we also continue to perfect our method for helping our users find the best hand-eye solution, as well as how to automate the process of hand-eye calibration. With this mindset, we have also provided sample tutorials to help you with the saving and automation of your hand-eye process. Check out one of our newest tutorials featuring RoboDK, which is compatible with any robot model that RoboDK has in its online library.
We first introduced hand-eye calibration in SDK 1.6, intent on providing the best results with the Zivid camera by using both the 2D and 3D data that the Zivid camera provides to find the transformation between the camera and the robot. Over the following releases, Zivid hand-eye calibration has evolved through consistent testing and optimization for finding the best solution to the deceptively simple equation of:
𝐴𝑋=𝐵𝑍
The Zivid API provides an interface that requires the point clouds captured by the camera of interest as well as the poses of the robot. Using this dataset, the user can relax and let Zivid take care of the hard work of finding the best solution to the hand-eye problem.
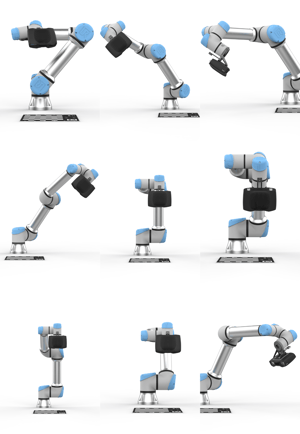 Different poses in an eye-in-hand calibration method
Building accuracy from the ground up
Hand-eye is just one puzzle piece in the picture to get a productive and reliable robot cell. With an accurate hand-eye, the relationship between the camera and the robot is known. But before we can rely on the hand-eye, it’s also important to emphasize the precision and trueness of the point cloud. The more trust you can place in the accuracy of the point cloud, the better hand-eye calibration you can achieve.
Factory Calibration
3D cameras are precision measuring devices expected to be able to capture a scene with millimeter or sub-millimeter accuracy. The Zivid Two cameras have between 0.2% and 0.3% or smaller dimension trueness error in their ability to capture the scene before them.
At Zivid, one of our main goals is for our technology to be intuitive to use and understand. This also applies to being able to determine the variation in the trueness of our cameras. There is no math needed based on distance and temperature to figure out the trueness of your camera. The trueness value is for our given temperature range of 0 – 40 °C over the working distance listed by the camera.
Infield Correction
To provide the best performance possible, Zivid also offers infield correction. To get the best result from high-precision technology, you always need the extra little cherry on top. While the camera is strong without this, it’s just a little better with infield correction added. This tool allows the user to verify the dimension trueness of their camera and provides a second layer of correction to the baseline calibration, bringing it to even tighter tolerances than the factory calibration.
Want to learn more about Zivid's calibration tools? Join our webinar "Achieving Optimal Hand-Eye Calibration" →
The Camera is True. What Next?
You’ve verified the camera. The results from your hand-eye look good. The feedback from the hand-eye calibration gives good residuals for angle and translation, indicating a high-quality hand-eye transform. The next step is verifying the system together. For this, Zivid has a touch test that is found on our GitHub page.
A touch test example using a Zivid board
The touch test provides visual feedback for the user to verify their hand-eye transform. The camera detects the same checkerboard used for the hand-eye calibration and touches it with the defined end effector point at the defined origin point of the checkerboard.
It is useful to place the checkerboard at different angles and orientations in the working volume of the system to verify the accuracy of the hand-eye calibration in different robot arm orientations. This helps to verify the validity of the hand-eye transform, not just in the poses that are used to create the dataset, but the actual working ability of the hand-eye transform.
Other sources of error
Creating an automation system requires the integration of many complex pieces, and since we are in the real world, none of them are perfect. One of my engineering professors always told us that “we don’t design for perfection, we design for requirements, we design for good enough”. So, let’s take a quick look at what some of the error sources can be that take our system from good enough to inoperable.
Robot joint error
Robots manufacturers focus a lot on the repeatability of their robots, but it’s important to understand repeatability is not the same as accuracy, and both are important. When the robot moves between point A to point B, how likely is it going to be to go to the same spot? This does not tell you what will happen if you find a point C and how accurately it will go to that location.
TCP calibration error
There are multiple methods that can be used to define the TCP of the robot. Most robot manufacturers provide their own built-in method for this calibration. There are other 3rd party options as well. For example, RoboDK has a method that also provides error statistics such as the mean error, standard deviation, and maximum error.
Detection error
Last but not least, we can encounter detection errors. This is the error we consider after verifying that the camera is operating as intended, with expected dimension trueness and low error when using the touch test. Sometimes the algorithm that is used for detection can get in poor matches. This can be due to new parts
being added, different lighting conditions, or perhaps a bad training dataset for the object detection algorithm.
Conclusion
Hand-eye calibration is just one part of the solution to getting the best results from your automation system. When trying to reach faster cycle times with more precise picks, it is crucial to evaluate the different error sources in your system. Having ways to isolate these different components and test for their trueness can help prevent headaches when problems occur. To help with this mindset, we provide the in-field correction tool to help isolate and verify what the 3D camera contributes to the system. We also provide a touch test in our code base to help verify the overall system accuracy through a touch test.
Want to know more? Join the webinar "Achieving Optimal Hand-Eye Calibration" with our special guest RoboDK:

The benefits of 3D hand-eye calibration
The practical guide to 3D hand-eye calibration with Zivid One+